Help
Everything Tiroko does, in the order you use it. Features marked Premium need the paid tier; everything else is included with no time limit.
1 · Getting started
What Tiroko is for
Knowing what you have left. A freezer, a cellar, a medicine cabinet, a store cupboard: wherever you keep things, you end up losing track. Tiroko holds the list, and above all keeps it true, because a wrong inventory is worth nothing.
Everything works offline, with no account. Your data lives on your smartphone. A shared base goes directly from one smartphone to the other, over the home Wi-Fi.
The first launch
On first opening, one screen sums up the idea, then the app asks you to choose your first base from seventeen templates.
On the free tier, that choice commits you. The first base you enter an item into becomes your free base, and it is the only one you will be able to add to and take from. The other sixteen are there, you can open them, read them, change them, you just don't write in them. And you don't create new ones: creating a base goes through the wizard, which is premium. The details are in chapter 2.
A new base opens on a rapid-entry field: type a name, confirm, move to the next. Each item goes in at 1, dated today. The rest is filled in from its entry.
On premium the question disappears: every base accepts additions and removals, and you create as many as you like.
The three tabs
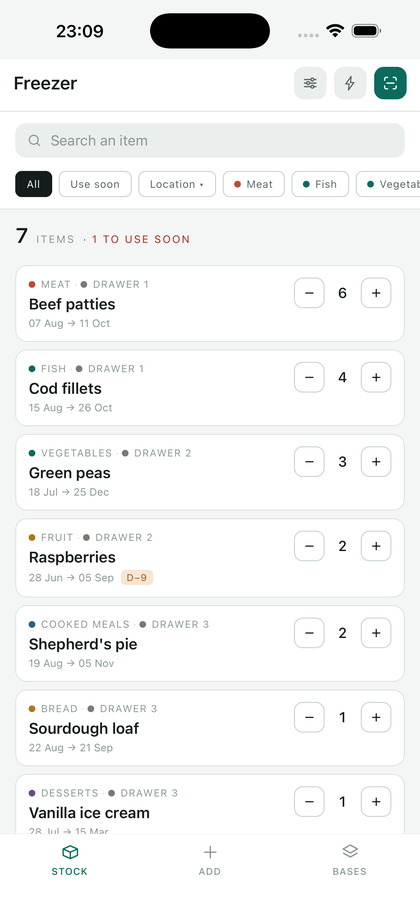
- Stock, the list of the base you have open. This is the screen you spend the most time on: you take things out and put them back without opening anything.
- Add, the entry form, built from the fields of the base you have open.
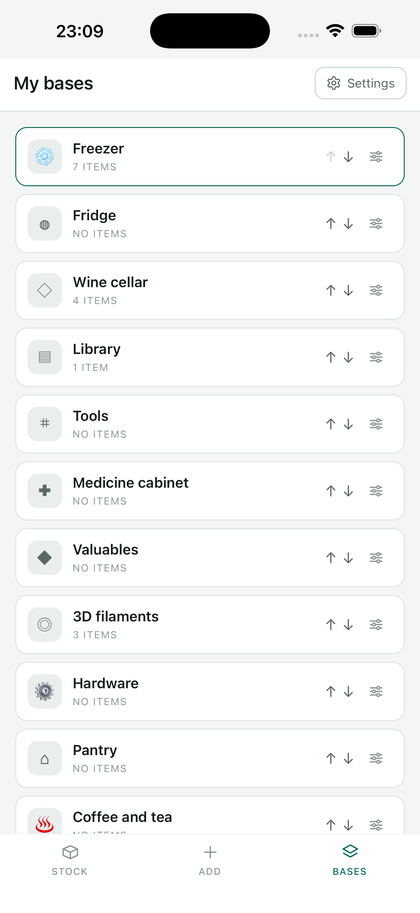
- Bases, the list of your bases, and the way into settings.

The app remembers which base was open: next time you launch it, you land where you left off.
2 · Your bases
A base is a piece of furniture: a freezer, a bookcase, a drawer full of screws. Each has its own fields, categories and locations.
To build your own from scratch, follow the walkthrough Build a base: moving boxes, fifteen fields commented one by one.
The seventeen templates
Freezer, fridge, pantry, wine cellar, coffee and tea, library, tools, hardware, medicine cabinet, valuables, 3D filaments, batteries and bulbs, paint, electronic components, sewing, games, camping. Each template arrives with fields made for its use: a vintage and a region for the cellar, a diameter and a material for filaments, an expiry date for the medicine cabinet, with, for that one, a reminder thirty days ahead.
An eighteenth choice exists, the blank base, which presumes nothing. Premium
Rename, recolour, reorder
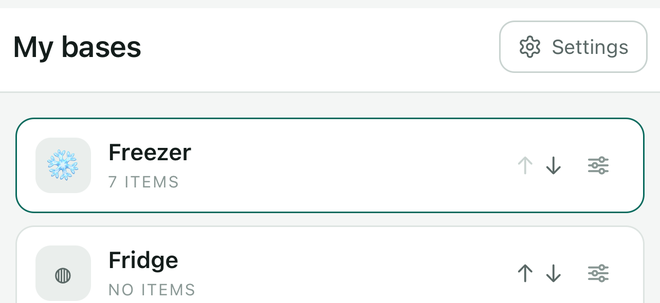
From the Bases tab, the settings button on each row opens its options: name, colour, icon. The ↑ ↓ arrows change the order, put the one you open every day at the top.
Hide or delete
In the Bases tab, Choose the bases shown lists all your bases, hidden ones included. Tick the ones to show, then Confirm. A hidden base keeps its entries: tick it again to get it back. The active base stays ticked, and without premium, the free base too.
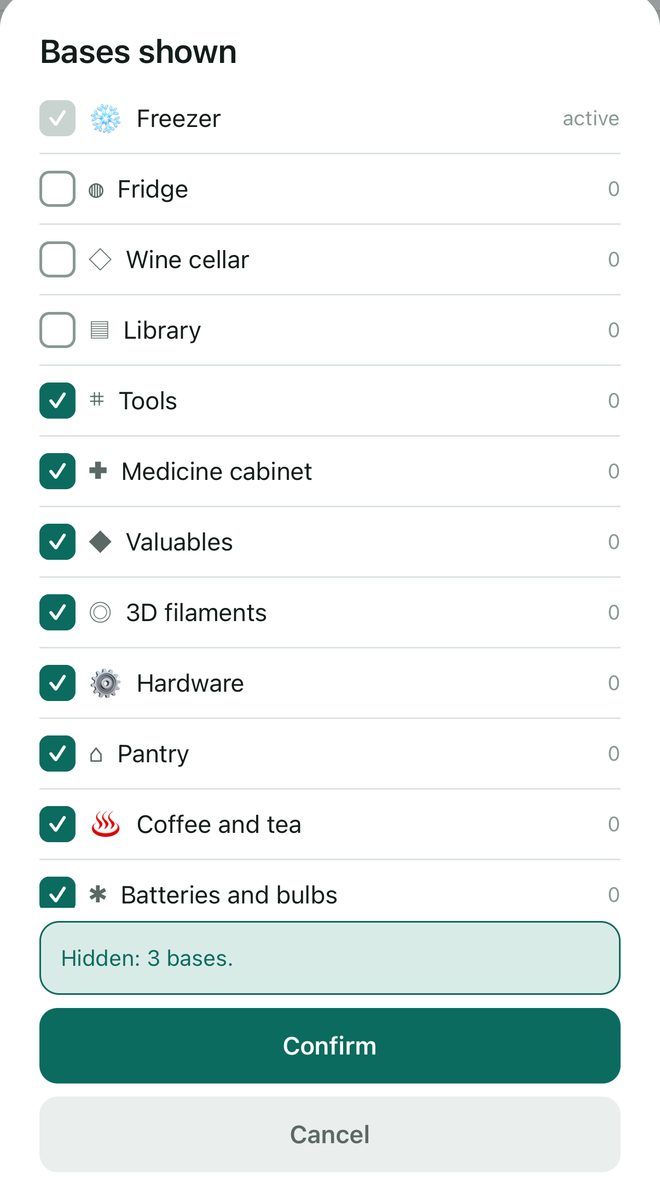
Deleting erases the base and its entries, for good. The button is at the bottom of the base's settings. On one of the seventeen supplied bases, it only appears once the base is renamed.
Adapting the fields
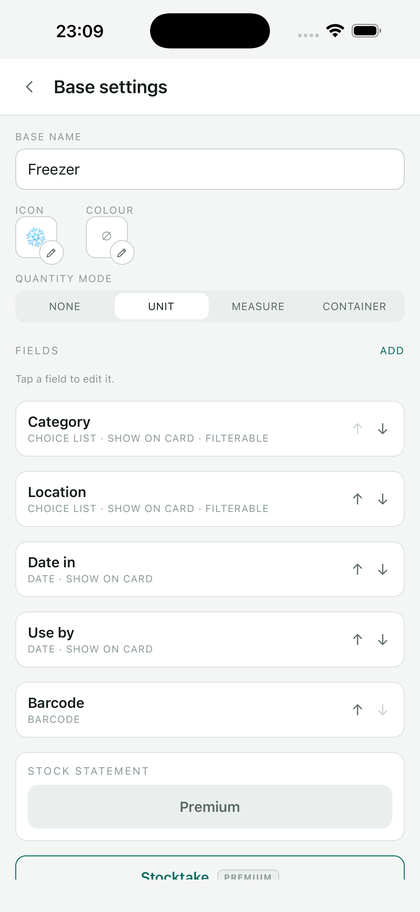
Categories, locations and option lists are edited in the base's settings: rename "Drawer 1" to "Vegetable bin", add a filament colour, remove a category you never use. The template is a starting point, not a straitjacket.
The name, at the top of the list, can be renamed too, for example to “Title” in a library. It stays required and at the top of the entry.
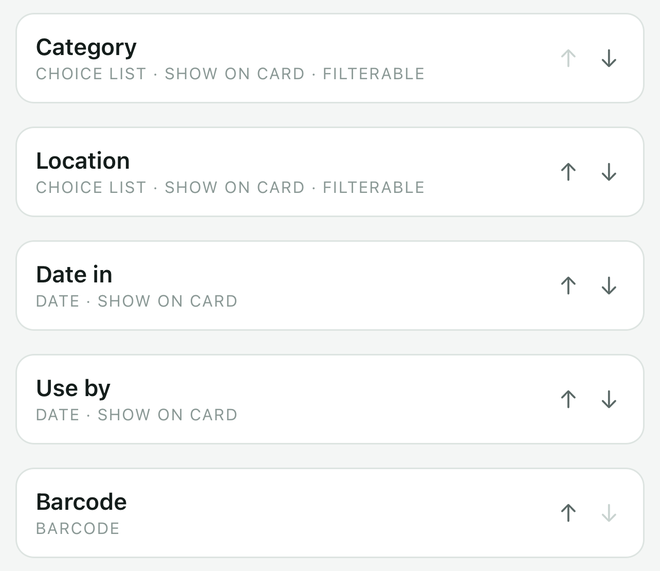
In a choice list, the ↑ ↓ arrows change an option's rank, and that rank is the one you see in the row when adding an item. Below the list, Alphabetical order sorts everything at once, Select ticks several options to delete them together. If items use one of the deleted options, the app asks where to reassign them, once for the whole batch.
Adding or removing a field Premium
Beyond the options, the structure itself opens up: add a "Lent to", "Serial number" or "Supplier" field, or take out one you never use. The entry form rebuilds itself.
The ten field types
Choice list for fixed options, Text for free typing, Long note for several lines, Number with its unit, Date, Barcode, Yes / no, Photo, Rating from zero to five, and Price.
A choice list field fills the row of chips at the top of the stock. A long note field is written one line per object: that is what the search reads afterwards.
Fields that fill themselves in Premium
A Number or Date field can fill itself in when the entry is created. The setting is in the field screen, under Fills in by itself.
- A number counts up. The first entry takes 1, the next 2. A number already used is never given out again, even if its entry has been archived: two boxes numbered 12 in the same inventory would never be told apart.
- A date is set to the day itself. Handy for a date added or a date packed, which nobody ever thinks of typing.
You keep control: a value you type yourself is never overwritten.

What a field shows on the card
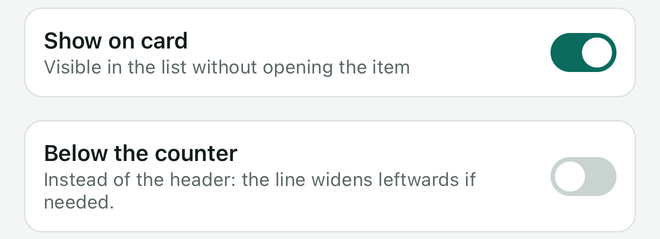
A field marked Show on card appears in the list without opening the entry. It has two possible places.
- In the header, above the name, in small capitals. That is where categories and locations belong.
- Below the counter, the bottom line. It widens leftwards when it needs to, so it takes longer text: contents, a note, two dates.
The creation wizard Premium
It is the only way to add a base to the seventeen supplied, hence the Create a base button at the bottom of the Bases tab. The wizard asks you a few questions, what are you storing, are you counting units or weights, are there dates to watch, and builds the matching base, with a preview of the card as soon as you add the first fields.
Several bases Premium
On premium, all your bases accept additions and removals. On the free tier, only yours does; the others show a banner reminding you which one it is, with a shortcut to go there.
How your free base is chosen
You don't pick it in a setting: your first item picks it. The day you enter something into the freezer, the freezer becomes your free base.
From then on, you add and remove in the freezer, with an unlimited number of entries. You open, read, filter and export the other sixteen, but you don't write in them, a banner reminds you, with a shortcut to yours. And there is no button to change your mind.
"And if I hide the freezer, can I take another one?"
No. Without premium, the free base cannot be hidden: it stays ticked in Choose the bases shown.
The only move that frees the slot is deleting the freezer , and it takes its entries with it. Your next entry, in the filaments say, then makes that base the new free one. A deleted base does not come back: neither it nor its contents. Only a backup file or restoring to an earlier date can bring them back, and even then, the free base stays the one your entry chose in the meantime.
Sharing a base between smartphones Premium
In a base's settings, Share with another smartphone shows a QR code. On the other smartphone, in Tiroko: Bases, Join a shared base, then scan the code. Both smartphones must be on the same Wi-Fi, and the QR code screen must stay open until the first sync is done.
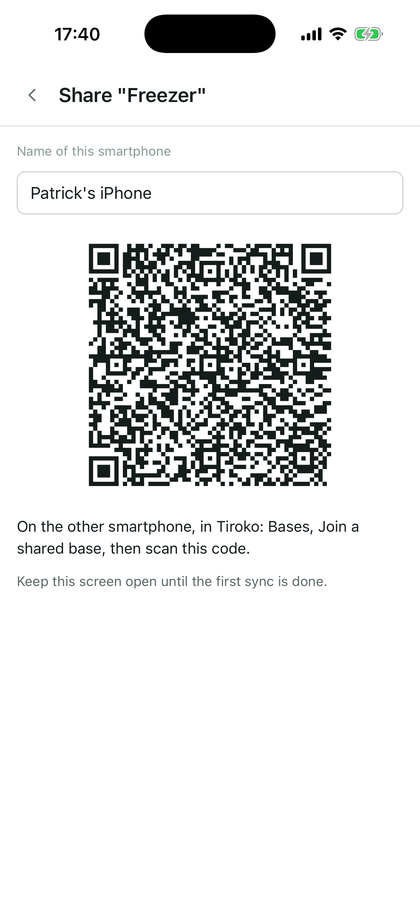
Only the smartphone that shares needs premium. The one that joins takes out, puts in and creates items; fields and options stay managed by the smartphone that shared. Without premium, the joined base becomes the free base.
Syncing happens when Tiroko opens and after each change, when both smartphones have Tiroko open on the same Wi-Fi. Sync now, in the shared base sheet, starts it again. Photos follow the items. Two stocktakes of the same item made at the same time add up: redo it on one side only.
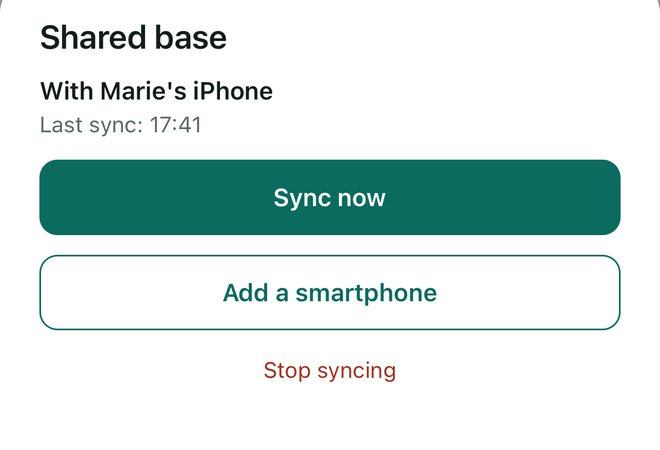
Add a smartphone shows the QR code again for one more person. Stop syncing ends the sharing: each smartphone keeps its full copy.
Syncing doesn't happen. Both smartphones must have Tiroko open, on the same Wi-Fi. A guest network, or a router that isolates devices from each other, prevents syncing. On iPhone, check Settings, Tiroko, Local Network.
3 · Adding an item
The form
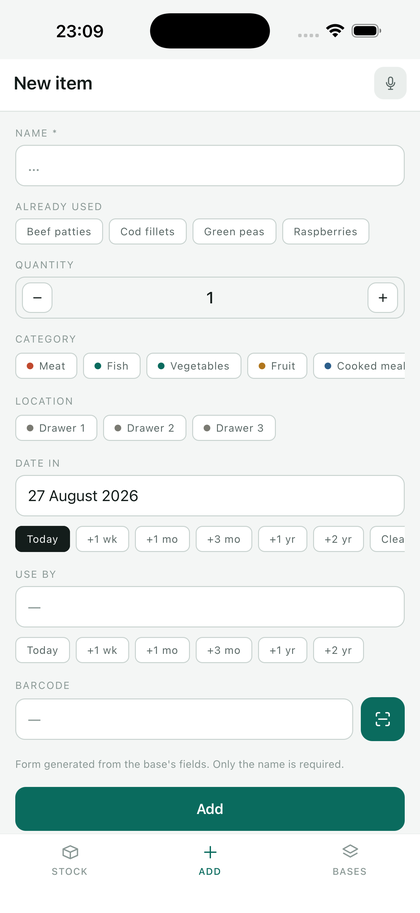
Only one field is required: the name. Everything else, quantity, category, location, dates, has a sensible default, and today's date is already filled in. Under the name field, a row of "Already used" chips offers the names you have entered before: one tap is enough to start again.
A long press on a field's name, or on one of its chips, sets the starting value of the next items. A banner confirms it. The same gesture on that value removes it. Items already saved do not change.
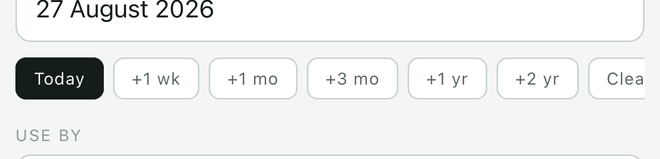
Dates have shortcuts: Today, +1 wk, +1 mo, +3 mo, +1 yr, +2 yr. For a warranty or a distant expiry date, it beats the calendar.

Scanning a barcode
The scan button, at the top of the Stock screen, opens the camera. Tapping the image refocuses it. A code surrounded by a border printed too close reads badly: move the phone back, then bring it closer slowly. A recognised code pre-fills the entry: name, brand, sometimes the category. The data comes from open databases kept by their communities , Open Food Facts for food and general goods, Open Library for books. Each Tiroko base picks its source, or none: there is no point querying a food database for a filament spool.
An unknown product is typed in by hand, and the app remembers it: next time you scan the same code, the entry fills itself in.
Scanning is also available inside an entry, on the barcode field, to attach a code to an existing item without leaving what you are typing. In the Add form, a code scanned or typed into this field also fills in the name, and a book's author, if they are empty. If the code is already in the base, a box says so, with a link to the entry.
The search for the title shows while it runs. If the reference is unknown, or if the server does not answer within thirty seconds, two buttons offer to try again or to type the title.
The camera won't open
If you refused camera access the first time, the app cannot ask again: the system blocks the second request. An Open settings button then appears in the scan screen and takes you straight to the right place, turn Camera on for Tiroko, then come back.
A field for typing the code by hand stays available in every case.
Finding a book's ISBN
In a library, Find the ISBN from the title, under the ISBN field of the entry or the form, asks Open Library using the title. Choose the book, then the edition: the ISBN is filled in, and the author if it was empty. An ISBN already there is replaced. Editions without an ISBN cannot be chosen.
The author is written into the text field whose Receives the author switch is on, in the field's screen: the Author field of a library created from the template. One field per base.
From Tiroko Scan
In Tiroko Scan, Open in Tiroko on a product code: if an item carries that code, its card opens. Otherwise, Tiroko asks which base to add it to and opens the form, prefilled with the code and the name.
Only shown bases with a barcode field are offered. If there is just one, the form opens directly.
Burst scanning Premium
For putting the shopping away: the camera stays open, each code read stacks an item, and you confirm the lot at the end. No going back through the form between two products.
What scanning cannot do instantly
Open Food Facts is a public database kept by a non-profit, and free for everyone. It limits each app to fifteen lookups per minute, across all of its users. In burst scanning, names therefore arrive one after another, about one every four seconds.
This never makes you wait: the entry opens straight away with the code, the name joins it, and a counter shows "3 codes to process" as long as some are left. You can keep scanning in the meantime.
A product already scanned once never goes back to the network: it is kept on your smartphone and comes back instantly.
Dictation Premium
"Four beef patties, two salmon fillets, a bag of green peas": Tiroko cuts the sentence up, pulls out rows with their quantities, and shows them to you for confirmation before writing anything. Units are understood, "a kilo of flour" becomes a row reading "Flour, 1 kg". In a base counted in containers, the dictated number counts sealed containers. Between two items, say "and": a pause does not separate them.
Dictation is free for your first 20 items.
Photos Premium
One photo per entry is included. Premium allows several, useful for valuables: the object, its serial number, its receipt.
4 · Taking one out
The − and + buttons
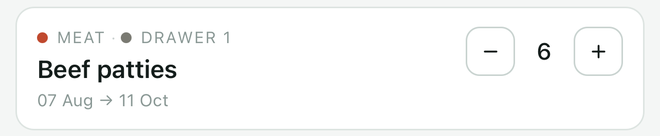
They are right there on the list, not buried in an entry. Standing in front of an open freezer, one hand is enough. It is the app's most frequent gesture, and it takes one tap.
Down to zero
When the quantity reaches zero, the item is archived: it leaves the list without disappearing. A banner gives you five seconds to undo , long enough to notice you tapped the wrong row.
An archived entry stays readable and can come back into stock: nothing is erased until you ask for it.
Container mode
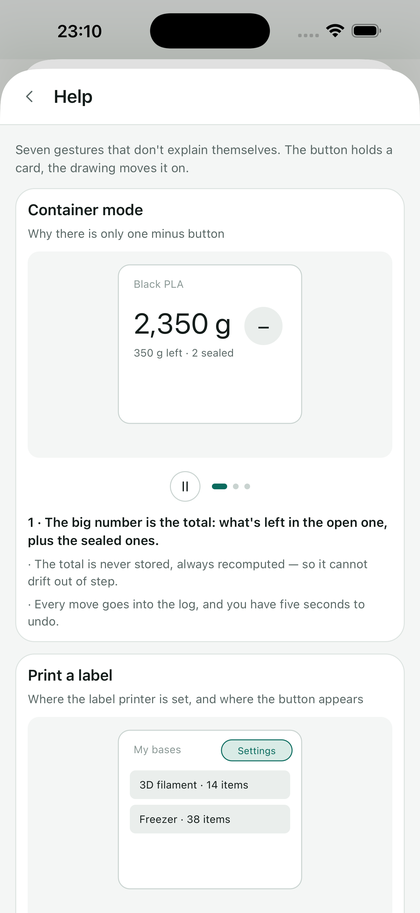
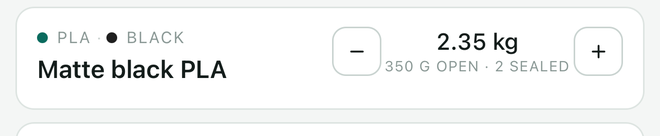
Some things aren't counted one by one: a filament spool, a sack of pet food, a drum of oil. In container mode, an entry shows a total, 2.35 kg, say, and underneath the detail: 350 g open · 2 sealed.
The − button takes from the open container. When it is empty, Tiroko opens the next one by itself and decreases the sealed count. The big number is never stored: it is recomputed every time, so it cannot drift out of step with the detail.
Quick take-out Premium
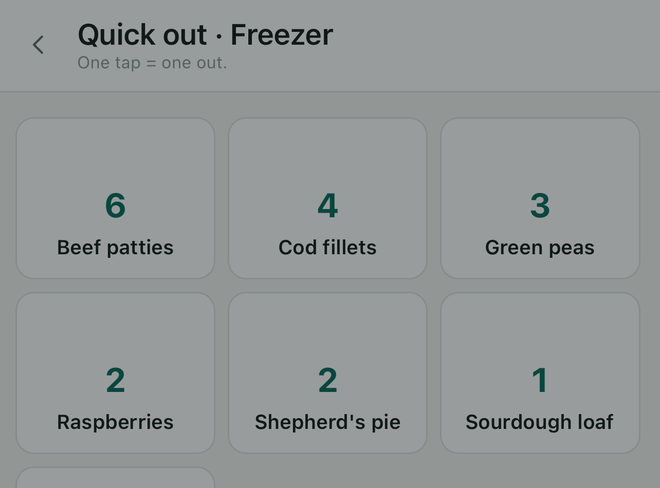
A screen full of big buttons, holding your twelve most frequently removed items. No search, no scrolling: you tap, it is counted down. Made for walking past the cupboard with your hands full.
A switch at the top of the screen goes from Take out to Put in: a tap then adds an item instead of removing one. In a base counted in containers, it adds a sealed container. On that side, items that ran out less than three months ago come back into the grid, and the New item tile opens the add form; opened by a location's tag, it fills in that location. The screen always opens on Take out.
The shopping list Premium
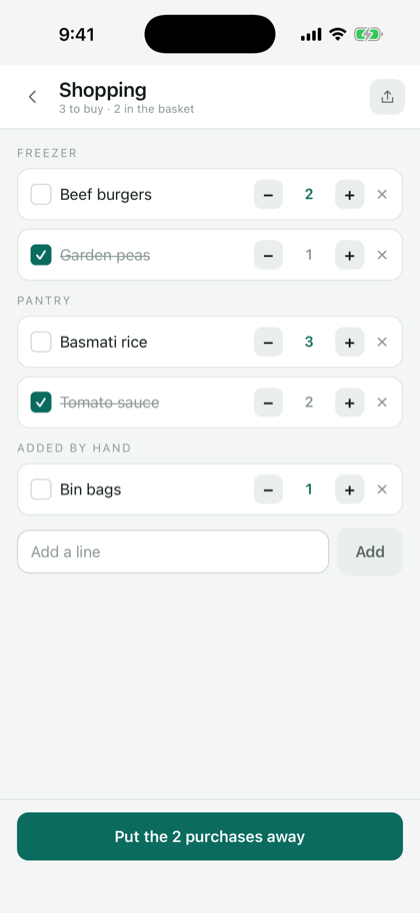
The cart button, at the top of the Stock screen, opens the shopping list. It gathers whatever ran out less than three months ago in all your bases, and the lines you add by hand. The − and + buttons set the quantity. The cross removes a line without touching the item.
At the shop, tick what you take. Put the purchases away puts the quantity of each ticked line back in stock and removes them from the list. The send button, at the top right, shares what is left to buy.
Scan to remove Premium
Scan the barcode of a product already in stock and the app offers to take it out rather than add it. The same gesture works both ways.
Transfer to another base Premium
On an item, Transfer to another base moves a quantity to a base that counts the same way: by the unit, by weight or volume, or in containers of the same size. With containers, only sealed ones move.
If the destination base has an item with the exact same name, the quantity is added to it. Otherwise an item is created with the fields both bases share; before you confirm, the box lists what is carried over and what is not. A transfer counts neither in waste avoided nor in "To buy again".
The movement log
Every addition and every removal is recorded with its date, at the bottom of the item's entry. That is what lets you understand afterwards what happened , and what feeds waste avoided and restoring to an earlier date.
5 · Finding things
Search and filters
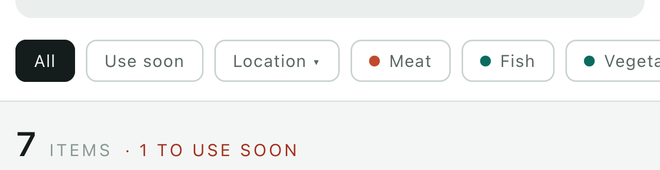
The search field searches the names. Below it, a row of filters: All, Use soon (what is nearing its date), the location, then the base's categories. Filters combine with the search.
The counter at the head of the list always says how many items are showing, and how many are coming due.
QR code labels Premium
A QR label stuck on an object opens its entry when scanned. It earns its keep where the contents can't be seen: an opaque bin, a closed box, a carton in the loft.
Two forms:
- One at a time, from an item's entry, the QR code label button. It goes to a Bluetooth thermal label printer.
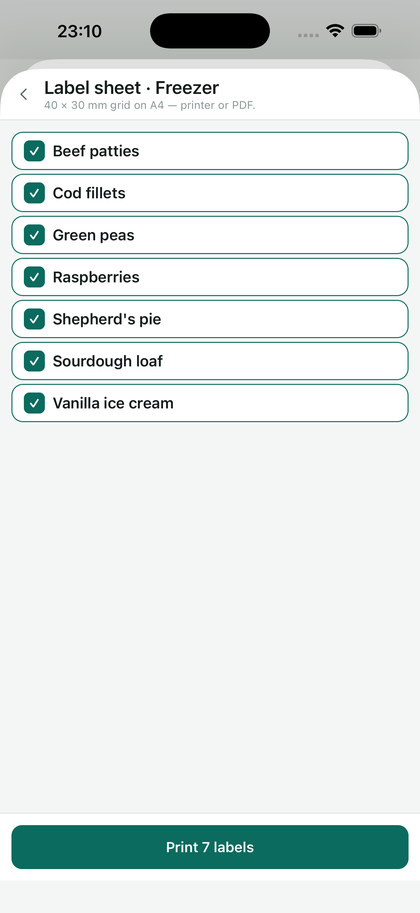
- As an A4 sheet, to label many at once: the page prints on any printer, with dotted cutting lines.

Compose the label
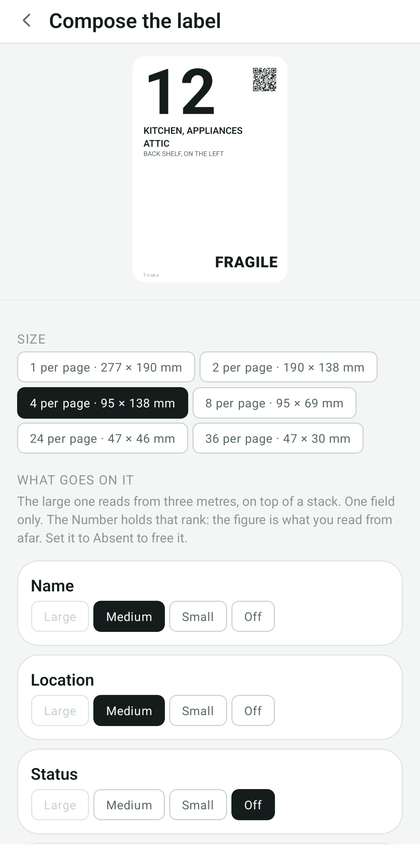
From the sheet, the Compose the label button sets what goes on it and at what size. The setting belongs to the base: a wine cellar and a moving box do not show the same fields.
The size, from a full-page label to thirty-six per page:
- 1 per page, 277 × 190 mm, for the door of a room.
- 2 or 4 per page, for a moving box read from the end of the corridor.
- 24 or 36 per page, for a screw bin or a storage box.
The fields and their weight. Each field is set to Large, Medium, Small or Off. Only one field holds the large rank, and it is the only one that reads from three metres. If the base has a Number field, it takes that rank by itself: it is the figure you read from afar. To give it to another field, set the Number to Off.
An empty field leaves no blank line, and a yes/no set to yes is printed as the field's own name: the ticked Fragile box prints Fragile.
A field placed on the label but empty on this item shows NOTHING TO PRINT HERE: the field is empty, the setting is not wrong.
When text overflows, a banner names the fields that DO NOT FIT. Shrink the large one, change size, or set fields to Off.
The preview at the top of the screen shows the label in the proportions of the chosen size. The Print button opens the phone's own preview.
Corner marks show where to cut without leaving a printed frame on the box.
The sheet says how many sheets will print before you start. And from an item's own card, Print on A4 outputs its label alone, with the base's settings, in landscape.
In the settings, Paper and units chooses between A4 in millimetres and Letter in inches: the sheet prints on that paper, and sizes show in that unit.
Above the list, the base's filters show only part of the items, and Never labelled keeps only those whose label has never been sent to print. The two combine.
The Bluetooth label printer Premium
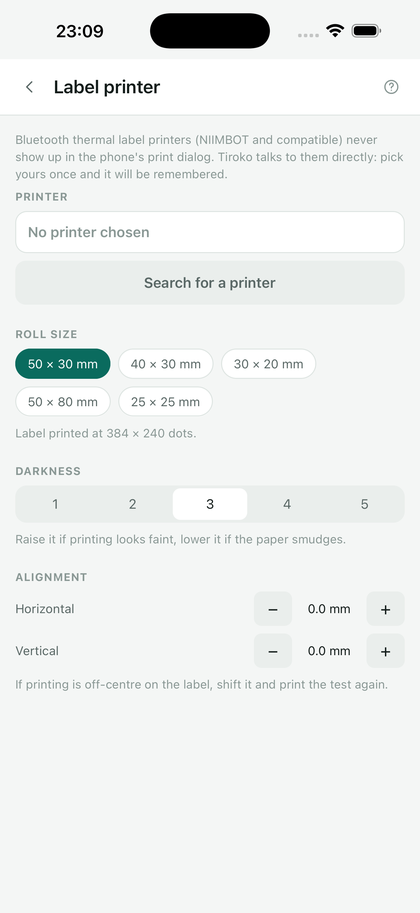
Tiroko talks straight to NIIMBOT label printers (B1, B21, D11 and close models), without going through their app. The reference format is the 40 × 30 mm roll.
- Turn the printer on and check it isn't connected to another app, nor paired in the smartphone's Bluetooth settings.
- In Tiroko: Bases → Settings → Label printer.
- Start the search, pick your device from the list, set the roll format.
- The Print a test button prints a QR code to tiroko.app: if it fits on a single label and scans, everything is in place.
Once the printer is registered, the print button appears in item entries.
The printer doesn't show up in the list
Three causes, in order of frequency: it is already paired in the smartphone's Bluetooth settings, remove it from there, Tiroko needs to connect to it itself; the official NIIMBOT app is open and holding it, close it completely; the smartphone's Bluetooth is off, or, on Android 11 and earlier, location is disabled, the system requires it to scan nearby devices, even though Tiroko never uses it to locate you.
A printer in deep sleep won't answer either: press its button to wake it before searching again.
The label comes out blank, or the paper feeds with nothing on it
The roll is the wrong way round: the thermal side must face the print head. Turn it over and print another test.
NFC tags Premium
An NFC tag does not point at an item: it points at a base, or at a location inside that base. You stick it on the furniture, the freezer door, the side of the cellar rack, but also on a container: a large workshop bin, a crate, a shelf. Resting the smartphone on it opens what is inside.
The rule is simple: one tag per storage spot, one QR per item. Resting the smartphone beats aiming at a code, but a tag costs a few tens of cents and would leave with the object once used up; a printed label costs almost nothing.
On metal, you need a tag made for it. An ordinary tag stuck on a freezer door, a fridge or a metal cabinet will not respond: the metal absorbs the field. Get an NTAG213 in its "on-metal" version, which carries a ferrite layer and costs a few cents more. On wood, glass, plastic or cardboard, an ordinary NTAG213 is fine.
Writing is done from the base's settings. On iPhone as on Android, bring the tag close when the app asks.
A tag can point at one location rather than the whole base. Before writing, under What the tag will open, choose a value in one of the filterable fields: an "Attic" tag stuck on the attic crate opens quick out on attic items alone, not on the base's forty.
Renaming the field, or changing the base's filters, does not break tags already stuck.
NFC doesn't react
If the tag is stuck on metal without being made for it, it will never respond, wherever you rest the phone: you need an on-metal NTAG213.
On Android, check that NFC is switched on in the system settings. On iPhone it always is, but the aerial sits at the top of the back of the device: present that area to the tag, not the middle. A tag already locked by another use can no longer be rewritten.
6 · Staying accurate
Nobody gives up on an inventory because a feature is missing. They give up the day it says three steaks and there are none. This chapter gathers everything built to prevent that day.
Expiry reminders
One notification a day, at the hour you choose: "3 products are nearing their date this week". Not one per item, not one per base, one, read in a second.
The warning window and the sending time are set in Bases → Settings → Notifications. Bases without an expiry date send none, naturally.
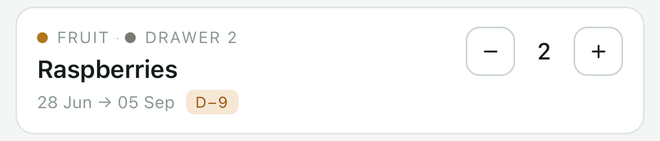
The items concerned carry a badge in the list, D−9, for instance, and the Use soon filter gathers them.
I get no notifications
First check that you have allowed them for Tiroko in the smartphone's settings. Then, on many Android phones, Xiaomi, Huawei and Samsung in particular, the battery saver stops apps running in the background: find Tiroko in the battery settings and set it to "unrestricted".
Stocktake mode Premium
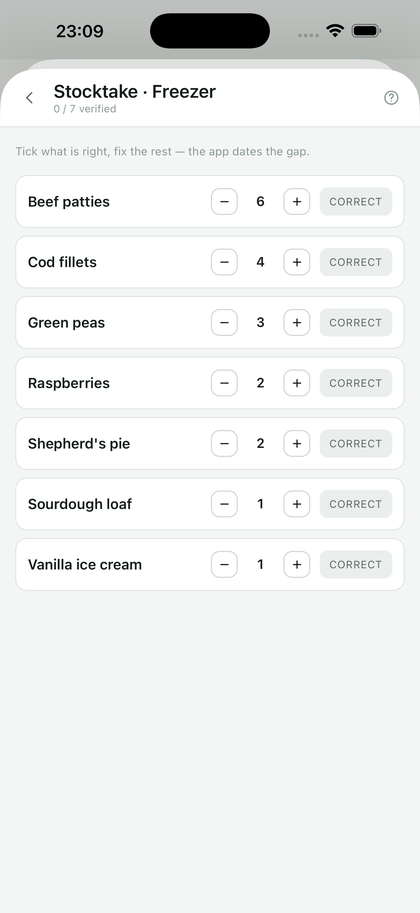
Twice a year, ten minutes: the screen shows the list in large type, you tick what you find, you fix what doesn't match as you go. At the end, the app tells you what went unticked and offers to archive it.
It is the only way to catch up with the drift, the item somebody else took out, the one nobody remembered to count down.
The confidence score Premium
It measures one simple thing: how long each entry has gone untouched. An entry unchecked for eight months is probably wrong; the app flags it by itself rather than waiting for you to find out in front of the cupboard.
Waste avoided Premium
From the movement log, Tiroko counts what left before its date rather than after. It is the encouraging side of the reminders: you see what the discipline earned.
What needs buying again
The To buy again filter, in the top row, brings out items that reached zero less than three months ago. After that, they leave the list.
When the last item is taken out, the Stock screen says so and opens this filter with one button.
The date used is that of the last movement, not the last edit of the entry: fixing a spelling does not reset the clock.
7 · Your data
Where it is
On your smartphone, nowhere else. Tiroko has no account and no server.
Backups
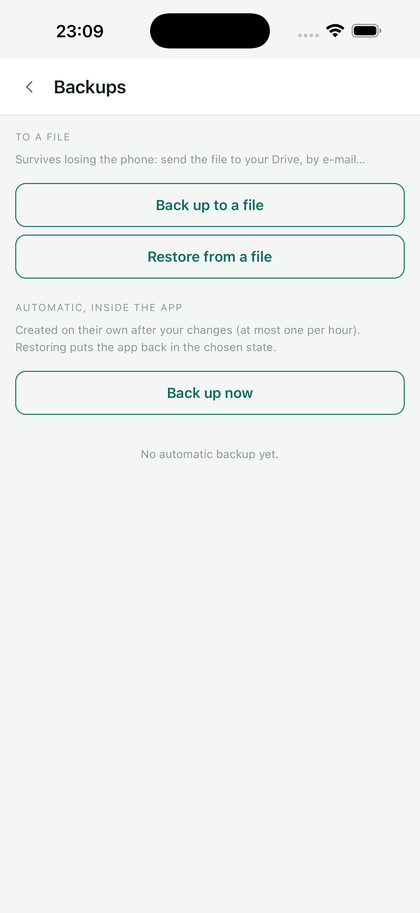
The app backs up locally, on its own. You can also export a backup file from Bases → Settings → Backups: a single file holding everything, to keep wherever you like, cloud, computer, USB stick. The same screen knows how to read it back.
Changing smartphone
Restore your old device's general backup (Apple or Google) onto the new one: Tiroko and its data follow. Otherwise, export the backup file on one side and import it on the other.
Going back to an earlier date Premium
The app keeps one backup per day, over the last five days. If something went badly wrong, a failed import, an unfortunate deletion, you pick a date and get the state it was in then. The red cross on a row deletes that backup, except the most recent one.
CSV export Premium
A spreadsheet file, one row per item, every field in columns. To do your own sums, or to leave for somewhere else: your data isn't held hostage.
CSV import Premium
The other way round: picking up a list kept in a spreadsheet, or taking over the base from another phone. From the base settings, Import a CSV.
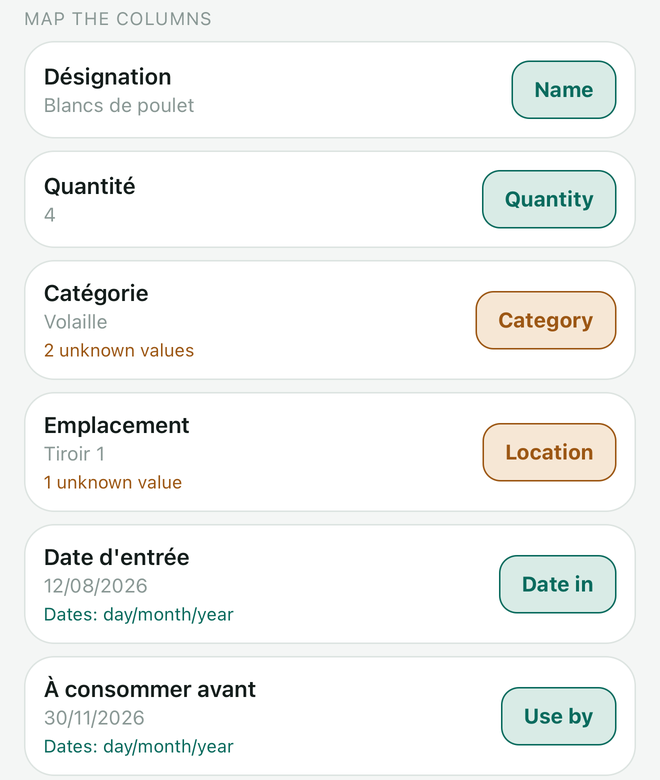
A file exported from Tiroko maps itself, in any of the six languages: you only have to confirm. A file from elsewhere goes through the mapping screen, one row per column.
Map the columns
Each row shows the column name and its first value: “Qty” means nothing on its own, it is the “6” underneath that gives away a quantity. On the right, what the column will become.
A column can be ignored, and it is by default when its name matches nothing: Tiroko does not invent a field for somebody's private notes.
A column of dates or numbers announces what it understood, “Dates: day/month/year”, “Comma decimals”. One tap flips it. “03/08/2026” is the 3rd of August or the 8th of March depending on the spreadsheet that wrote it, and the file does not say which.
Unknown values
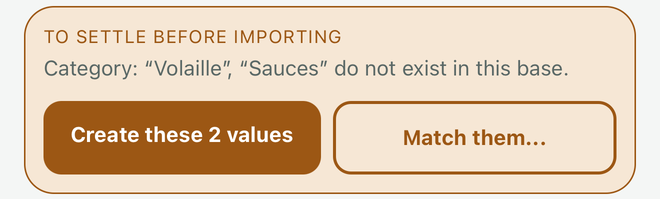
This is the trap of every import: the file says “R2”, the base has “Rack 2”. Creating “R2” would split the stock in two without anyone noticing. An amber block announces those values and offers two buttons: create them, or match them one by one to an existing option. The matching screen says how many rows carry each value: “R2” on 148 rows is not handled like “R2” on two.
What gets written, and what does not
Nothing is written before the final button. The preview of the first five rows shows what will go in.
- A row without a name is not written: an entry with no name can never be found again.
- An unreadable cell leaves the field empty without losing the row. A file of four hundred rows is not refused over one mistyped date.
- Every imported item writes its own movement in, just like typing it by hand.
The final report says what went in and what did not: items added, rows without a name, unreadable cells, values created.
The CSV template Premium
The CSV template button gives an empty file carrying your base's own headers, in your language. Enough to prepare a list on a computer without guessing the wording. It is worked out the moment you ask for it: it always carries the fields you have today.
Stock value and PDF inventory Premium
When a base carries a price field, Tiroko adds it up. The PDF inventory lays out the entries with their photos and their values, the document you send to your insurer after a flood, and are very glad to have prepared beforehand.
The document is saved under the base's name and the day's date, then the phone's share sheet opens: Files, e-mail, Drive or printer.
8 · Settings
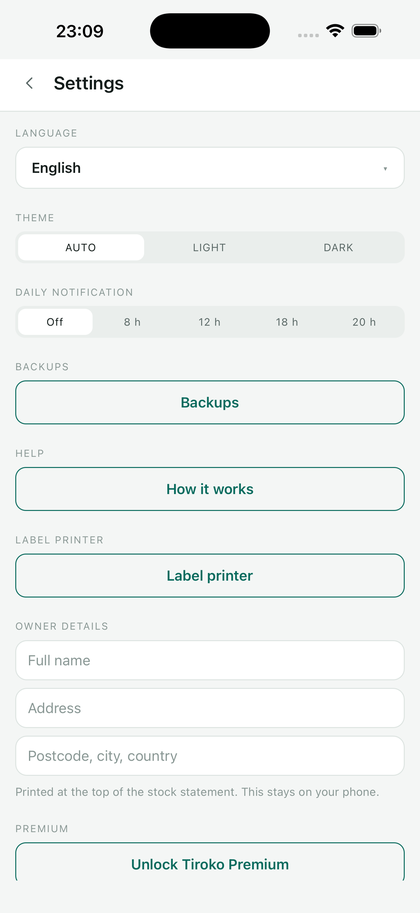
They open from the Bases tab, button at the top right.
Language and theme
The app exists in French, English, Spanish, German, Italian and Portuguese. It follows the smartphone's language on first launch, and you can pick another at any time. The light or dark theme also follows the system, unless you force it.
Notifications
Sending time of the daily reminder, and how far ahead to warn.
Label printer
Search, pairing, roll format, test print. See chapter 5.
An idea for Tiroko?
The button of that name, in the settings, opens your mail app with the address and subject already filled in. Write down what you are missing: that is what decides what gets added. The Roadmap page says what is already planned.
Share and rate
Share Tiroko opens the phone's share sheet with the store listing's address. Rate the app opens the store's review form directly.
Backups
Export and import of the backup file, and, on premium, restoring to an earlier date.
9 · Premium
What is free, forever
One base of your choice among the seventeen templates, with an unlimited number of entries, its fields and categories adaptable, barcode scanning, expiry reminders, the movement log and backups. We never charge for having entered a lot.
The other sixteen bases stay openable and readable on the free tier; you just don't add to or take from them. Creating another base needs the wizard, so premium.
What premium adds
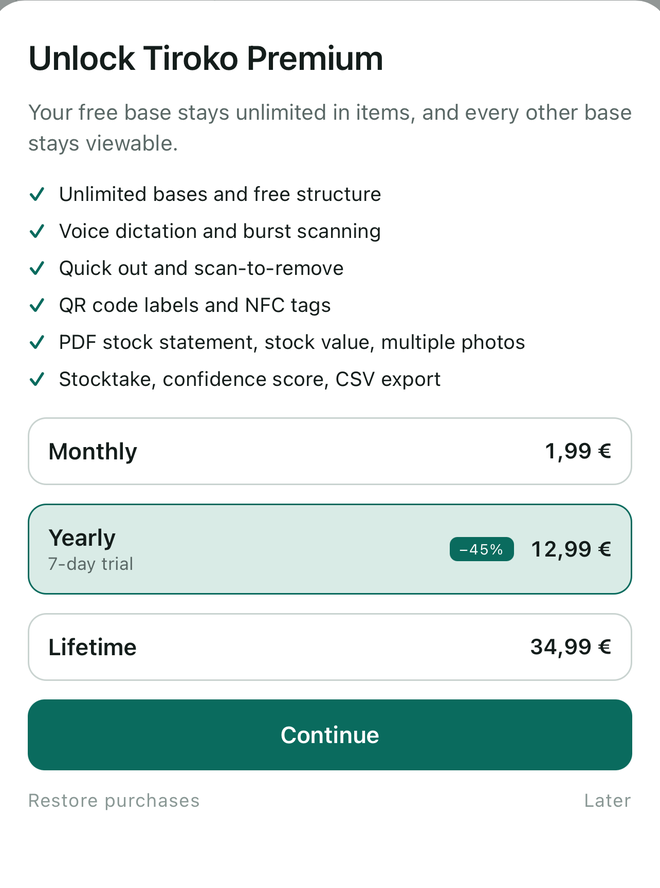
Unlimited bases and free structure, sharing a base between smartphones, blank base, creation wizard, voice dictation, burst scanning, scan to remove, quick take-out, NFC tags, QR code labels, stocktake mode, confidence score, waste avoided, shopping list, multiple photos, CSV export, restoring to an earlier date, stock value and PDF inventory.
The home screen widget
Two sizes, to place on the phone's home screen.
- The small one shows a number: what is due to be used soon in your base, otherwise the stock. One tap opens the list already filtered.
- The large one shows three items with a minus button on each row: one tap takes an item out without opening the app. The number on the right is what is left, and it cannot be tapped. Tapping the name opens the item.
These are the same items as quick out, in the same order. An item taken out from the widget is written for good at the next launch, with its movement: the widget's number drops straight away so as not to lie under your finger.
The three plans
- Yearly, with a seven-day free trial.
- Monthly, no commitment.
- Lifetime, one payment, no renewal.
Prices appear in your own currency, inside the app.
Restoring a purchase
New smartphone, reinstall, promo code redeemed on the store: the Restore my purchases button, on the plans screen, forces the check with Apple or Google. No account to create.
Cancelling
From your smartphone's subscription settings: App Store (Settings → your name → Subscriptions) or Google Play (Profile → Payments and subscriptions). Cancellation takes effect at the end of the current period, and your data doesn't move: bases become readable again, and CSV export stays available for thirty days so you can get everything out.
10 · When it doesn't work
Each remedy is written in the chapter where the problem comes up. Here is the list to go straight to the point.
- The camera won't open
- The printer doesn't show up in the list
- The label comes out blank
- NFC doesn't react
- I get no notifications
- Syncing doesn't happen
Something else? Write to us: contact@tiroko.app. Give your smartphone model and what you did just before, that is what makes it reproducible, therefore fixable. See also the Support page.